Asia is fascinating. We filmed in Thailand twice and this summer we decided to capture Indonesia. You can watch the video we captured below:
To able to shoot easy and fast I decided to take the Sony RX10. Yes, this is not the most cinematic camera with a shallow depth of field due to the small sensor but it’s still great for travelling. Unfortunately we didn’t get our hands on the new Mark II version but are still happy with the results.
You can buy the Sony RX 10 here.
Usually I like to shoot everything flat except when it’s news or something that needs to be edited and delivered quick. In this case the saturation was set to 0 which would look pretty normal to most viewers. The reason why I decided to shoot with high saturation is simple. Big cities like Jakarta or Bangkok are polluted and usually grey which means the footage will naturally look desaturated.
Even though the RX10 records XAVC-S files with a bitrate of 50 Mbps I wanted to avoid blocking or colored noise. I did a few tests and figured out that it’s really better to shoot with a “normal” saturation to avoid an extreme loss of color. In certain shots the footage looked very digital (straight out of the camera) because of the extreme saturation, in others it only needed a bit of color adjustment in post.
The short film “A Glimpse of Indonesia” was edited in Premiere Pro CC 2014. We just didn’t have the time yet to switch to CC 2015. It’s always risky to upgrade software while editing bigger projects.
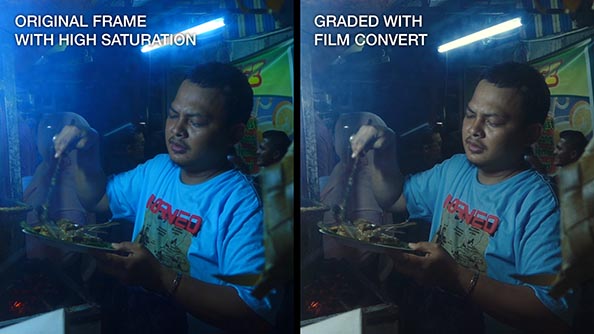
I used FilmConvert to color correct and grade all shots. One of the first steps was to desaturate most clips to get rid of the digital look. The Sony RX10 doesn’t have a dedicated camera profile in the software so I created a custom one. Before I decided to use FilmConvert I did a few grading tests in After Effects before editing the film in Premiere Pro. I used some of our own AE grading presets but decided to use FilmConvert instead because it was faster because our presets only work in After Effects but not in Premiere Pro and sending every file via Dynamic Link into After Effects would have been too much for such a small project especially when the result is pretty much the same with FilmConvert.
One of our favorite tools in Premiere Pro and After Effects is the Warp Stabilizer. You should never rely on it during a shoot but there are certain techniques that make it easier to stabilize shaky footage in post using this tool. The most important thing is to shoot at a higher shutter speed than usual. Most films are being captured with a shutter of 1/50s (to be correct 1/48s) or an angle of 180°. The motion blur looks filmic to our eye. The problem is that stabilization tools have troubles with blurry footage so it makes sense to shoot certain scenes at a higher shutter speed.
We made a little before-and-after-video of a tracking shot filmed in the back of a car. The shot is not super exciting so we didn’t put it full length into the short film. Although there are still two or three little bumps visible after applying Warp Stabilizer the stabilization worked pretty well overall. Mainly because the movement of the camera was logical. No fast pans. Just a drive through an intersection with a lot of bumps. In this case the shutter speed was over 1/200s to avoid too much motion blur.
The sound was mostly recorded with the new RØDE VideoMic Pro. We used the Stereo VideoMic X for a few nature shots. The city sound of Jakarta is a mixture of all kinds of sounds and overall chaotic. I decided to use the VideoMic Pro because it’s a directional microphone and allows me to capture a specific sound. Stereo sound would have been too confusing for the traffic shots because the audience would hear everything around the camera but not the specific sound they should hear. That could be problematic in close up shots where you see a certain vehicle but you don’t hear it because of all the other sounds around it.
Finding the right soundtrack took quite a while. The mood and rhythm just had to be right so there was a lot of searching and trying with different tracks during the post production.
The soundtrack we finally used is called “World’s End” by Lee Miller. You can check out the song on Premiumbeat.com.

You can also check out our photographs of Indonesia on Flickr.com/FenchelJanisch!
You can buy the Sony RX 10 here and the Sony RX 10 II here.
You can buy two versions of the RØDE VideoMic Pro here and here.
Check out our recommended Camera and Gear!
Written by Moritz Janisch


